Hi, I am Rakesh. Welcome to my blog


To create windows xp live cd, you have to download
BartPE (known as Bart's Preinstalled Environment, www.nu2.nu). Its a rescue tool. BartPE is a bootable CD based on XP. Its is used to solve many problem that might face during windows operations.


BartPE is based on Windows, which makes it suitable for the maintenance of Windows and to rescue files which are no longer accessible in case Windows won't boot anymore. Here are some of BartPE's features:

  • Copy personal files to a safe external location when Windows won't boot anymore.
  • Copy files from and to a network share.
  • Editing, moving or deleting of files which are kept occupied within Windows.
  • File recovery of deleted files with a file recovery tool.
  • Scanning of the hard disk for viruses, spyware,...
  • Diagnosing installed, but possibly defective hardware.
  • Searching the internet.
  • Reading of PDF files.
  • Creating an image of the operating system.
  • Recovery of the Windows registry.
  • The use of Remote Desktop.
  • And much more..., thanks to the many plugins available.

Building the bootable CD BartPE with PE Builder

It is not possible to download an image of BartPE because it is not allowed to distribute the Windows installation files. But this would not be practical because that would make it impossible to add plugins for additional features. BartPE is build with the free tool PE Builder (download: www.nu2.nu/pebuilder/#download) while using your own, original Windows XP installation files. After installation, PE Builder is available by the shortcut in the Start Menu and the desktop.

Searching for the Windows XP installation files
The original Windows XP installation files are needed to build the bootable CD. If possible, use the already installed files of the current Windows XP installation or otherwise copy the files of the original Windows XP installation CD to a special folder on the hard disk. In the example below (the main PE Builder window) the folder mentioned at Source is the current Windows folder. The Output folder (the installation folder of PE Builder) is used for building BartPE. In the second pane (Media output) describes the options for burning BartPE on CD/DVD.
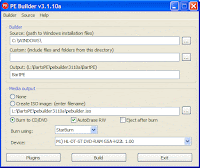
The first time PE Builder is started, the user is asked whether PE Builder must search for the original installation files. If this question has been clicked away, select the option Search (available by Source in the menu bar) and click Yes on the question Search for Windows installation files? (can take some time). In the example below, PE Builder found three source locations with usable installation files, each of the found locations is suitable (the source location on the C: partition contains the installation files of the already installed Windows, the J: partition contains a copy of the original installation files and the L: partition contains a slipstreamed version). When PE Builder can't find any usable installation files, it is still possible to use the original Windows XP installation CD.


Click the button OK and select one of the found locations in the next window (the installation files which have been slipstreamed with the latest service pack are preferred). All locations in this example contain the installation files of Windows XP Professional and are already slipstreamed with Service Pack 2.

TIP: The Windows XP installation CD is also accessible directly from the main window of PE Builder: click the button ... (next to the option Source) and browse to the volume letter of the CD/DVD player. It is better to copy the installation files to the hard disk first, because this will prevent placing the installation CD manually each time PE Builder is used to build BartPE


Building the bootable CD BartPE


Click the button Build in the main PE Builder window and the process of collecting, ordering and processing the files needed for BartPE starts. When PE Builder has finished, the log file shows the errors and warnings (use the arrow buttons to browse the log). If there are errors, the problem that causes the error has to be solved first before it is possible to burn the BartPE CD. When the folder C:\Windows of an OEM Windows version is used as source for PE Builder, the user is warned that in theory there could be some compatibility issues. Practice will tell if this is the case.


Burning BartPE on CD


After PE Builder has processed the installation files and plugins, it is time to burn BartPE on CD (or DVD). For some computers, additional hardware drivers are needed to get BartPE working. When the hardware (especially the hard disk) is not supported, it will be clear when the computer boots the CD. Because it is normal to burn BartPE multiple times before the definitive version is realized, it is wise to use rewritable CD's (CD-RW). The CD is burned directly from the PE Builder script, but only when an empty, writable CD is placed in the burner before the button Build has been clicked. If this is not the case, PE Builder will skip the last step of burning the CD without asking for an empty (re)writable CD.

In some cases, it is wiser to create an ISO image first and to burn it with your own burning software (and not to use the PE Builder build-in burning feature). Burning software like Nero has more options to control the burning process, like lowering the burning speed to get a more accurately burned CD (which can be used on older CD/DVD players as well).


Download

Latest version:
Download PE Builder v3.1.10a - self-installing package (3.15MB) - if you are unsure what you need to download, get this!
Download PE Builder v3.1.10a - zip package (3.23MB)
Post: View PE Builder v3.1.10a release postings on "The CD Forum"

USB 3.0

Mar 16, 2008 0 comments


USB 3.0 is the next major revision of the ubiquitous Universal Serial Bus, created in 1996 by a consortium of companies led by Intel to dramatically simplify the connection between host computer and peripheral devices. Fast forwarding to 2009, USB 2.0 has been firmly entrenched as the de-facto interface standard in the PC world for years (with about 6 billion devices sold), and yet still the need for more speed by ever faster computing hardware and ever greater bandwidth demands again drive us to where a couple of hundred megabits per second is just not fast enough.

In 2007, Intel demonstrated SuperSpeed USB at the Intel Developer Forum. Version 1.0 of the USB 3.0 (confusing, isn't it?) specification was completed on November 17, 2008. As such, the USB Implementers Forum (USB-IF) has taken over managing the specifications and publishes the relevant technical documents necessary to allow the world of developers and hardware manufacturers to begin to develop products around the USB 3.0 protocol.

In a nutshell, USB 3.0 promises the following:

  • Higher transfer rates (up to 4.8 Gbps)
  • Increased maximum bus power and increased device current draw to better accommodate power-hungry devices
  • New power management features
  • Full-duplex data transfers and support for new transfer types
  • New connectors and cables for higher speed data transfer...although they are backwards compatible with USB 2.0 devices and computers (more on this later)


Run command is very useful, but sometimes it is forgotten. Use it sometimes and you will find how powerful is run command.


1. Accessibility Controls - access.cpl
2. Accessibility Wizard - accwiz
3. Add Hardware Wizard - hdwwiz.cpl
4. Add/Remove Programs - appwiz.cpl
5. Administrative Tools - control admintools
6. Automatic Updates - wuaucpl.cpl
7. Bluetooth Transfer Wizard - fsquirt
8. Calculator - calc
9. Certificate Manager - certmgr.msc
10. Character Map - charmap
11. Check Disk Utility - chkdsk
12. Clipboard Viewer - clipbrd
13. Command Prompt - cmd
14. Component Services - dcomcnfg
15. Computer Management - compmgmt.msc
16. Control Panel - control
17. Date and Time Properties - timedate.cpl
18. DDE Shares - ddeshare
19. Device Manager - devmgmt.msc
20. Direct X Troubleshooter - dxdiag
21. Disk Cleanup Utility - cleanmgr
22. Disk Defragment - dfrg.msc
23. Disk Management - diskmgmt.msc
24. Disk Partition Manager - diskpart
25. Display Properties - control desktop
26. Display Properties - desk.cpl
27. Dr. Watson System Troubleshooting Utility - drwtsn32
28. Driver Verifier Utility - verifier
29. Event Viewer - eventvwr.msc
30. Files and Settings Transfer Tool - migwiz
31. File Signature Verification Tool - sigverif
32. Findfast - findfast.cpl
33. Firefox - firefox
34. Folders Properties - control folders
35. Fonts - control fonts
36. Fonts Folder - fonts
37. Free Cell Card Game - freecell
38. Game Controllers - joy.cpl
39. Group Policy Editor (for xp professional) - gpedit.msc
40. Hearts Card Game - mshearts
41. Help and Support - helpctr
42. HyperTerminal - hypertrm
43. Iexpress Wizard - iexpress
44. Indexing Service - ciadv.msc
45. Internet Connection Wizard - icwconn1
46. Internet Explorer - iexplore
47. Internet Properties - inetcpl.cpl
48. Keyboard Properties - control keyboard
49. Local Security Settings - secpol.msc
50. Local Users and Groups - lusrmgr.msc
51. Logs You Out Of Windows - logoff
52. Malicious Software Removal Tool - mrt
53. Microsoft Chat - winchat
54. Microsoft Movie Maker - moviemk
55. Microsoft Paint - mspaint
56. Microsoft Syncronization Tool - mobsync
57. Minesweeper Game - winmine
58. Mouse Properties - control mouse
59. Mouse Properties - main.cpl
60. Netmeeting - conf
61. Network Connections - control netconnections
62. Network Connections - ncpa.cpl
63. Network Setup Wizard - netsetup.cpl
64. Notepad notepad
65. Object Packager - packager
66. ODBC Data Source Administrator - odbccp32.cpl
67. On Screen Keyboard - osk
68. Outlook Express - msimn
69. Paint - pbrush
70. Password Properties - password.cpl
71. Performance Monitor - perfmon.msc
72. Performance Monitor - perfmon
73. Phone and Modem Options - telephon.cpl
74. Phone Dialer - dialer
75. Pinball Game - pinball
76. Power Configuration - powercfg.cpl
77. Printers and Faxes - control printers
78. Printers Folder - printers
79. Regional Settings - intl.cpl
80. Registry Editor - regedit
81. Registry Editor - regedit32
82. Remote Access Phonebook - rasphone
83. Remote Desktop - mstsc
84. Removable Storage - ntmsmgr.msc
85. Removable Storage Operator Requests - ntmsoprq.msc
86. Resultant Set of Policy (for xp professional) - rsop.msc
87. Scanners and Cameras - sticpl.cpl
88. Scheduled Tasks - control schedtasks
89. Security Center - wscui.cpl
90. Services - services.msc
91. Shared Folders - fsmgmt.msc
92. Shuts Down Windows - shutdown
93. Sounds and Audio - mmsys.cpl
94. Spider Solitare Card Game - spider
95. SQL Client Configuration - cliconfg
96. System Configuration Editor - sysedit
97. System Configuration Utility - msconfig
98. System Information - msinfo32
99. System Properties - sysdm.cpl
100. Task Manager - taskmgr
101. TCP Tester - tcptest
102. Telnet Client - telnet
103. User Account Management - nusrmgr.cpl
104. Utility Manager - utilman
105. Windows Address Book - wab
106. Windows Address Book Import Utility - wabmig
107. Windows Explorer - explorer
108. Windows Firewall - firewall.cpl
109. Windows Magnifier - magnify
110. Windows Management Infrastructure - wmimgmt.msc
111. Windows Media Player - wmplayer
112. Windows Messenger - msmsgs
113. Windows System Security Tool - syskey
114. Windows Update Launches - wupdmgr
115. Windows Version - winver
116. Windows XP Tour Wizard - tourstart
117. Wordpad - write


Most people have dropped their mobile phone into something, like the bath, the sink, the toilet, or even a cup of coffee. There are even cases of people jumping into the pool with a cell phone in their pocket or mothers hearing a grinding noise in the washing machine and realizing that Junior did not empty the pockets of his jeans and the noise was caused by his brand new cell phone.


A waterlogged phone often means that the instrument has to be replaced, but if the rescue happens fast enough it is possible to save a wet cell phone.
Remove the Battery and Sim Card


The obvious first step is to get the mobile phone out of the water/coffee/ washing machine as soon as possible. Cell phones have plastic covers that are relatively tight, which keep moisture out, but not water.

Some people recommend removing the battery while the phone is still under water as it helps dissipate heat and prevent short circuits, but others say this is not a good idea.
Anyway, the battery and sim card ( if the mobile phone has a sim card, some don’t) should be removed by whomever can get the phone out of the water as fast as possible, and after gently shaking much of the water out , the cell phone should be placed on an towel or some absorbent paper towels. The sim card must never have any heat brought neat it, so it is a good idea for someone just to pat it dry with a paper towel.


Dry the Cell Phone

This is where the experts differ – there are those who advocate using a hairdryer on a very low heat to blow the mobile phone dry; others recommend using a vacuum cleaner to “suck” the moisture out of the phone; others are proponents of putting the phone in a bowl of rice grains so that the rice can absorb the moisture and a similar school of thought prefers using silicon crystals to draw the water out of the wet cell phone.
Popular Mechanics recommends “Instead, opt for a can of compressed air, an air compressor set to a low psi or a vacuum cleaner (a wet/dry Shop-Vac would be perfect). The idea is to use air to push or pull moisture out through the same channels it entered.”
How to Dry a Wet Mobile Phone – Slowly

Taking a lesson from all the methods to dry a wet mobile phone, it is obvious that the one thing they have in common is that this is no quick fix. In fact, whoever is doing the drying should be careful not to heat the phone at all.

Absorbent paper towels are very useful for drying the outer parts of the cell phone, but the owner should take care not to get wet paper caught in the grooves inside the phone.
A good recommendation is to let the cell phone lie in a warm place (not direct sunlight) in a bed of clean cotton balls for six to 12 hours after it has been dried the first time.

Test the Cell Phone
After about a day it is time to test the cell phone to see if it works. The owner should first make sure that everything is clean and dry- looking and then re-attach the battery to the phone and switch it on. If it does not work, the fault might lie with the cell phone battery. The owner should then remove the battery from the phone and attach the phone to the charger without the battery to see if it works – if it does, then the battery is the problem.

Next, the owner could try to recharge the battery. If this does not work, the cell phone should be taken to a dealer where the owner should explain in detail what happened. They still might be able to save the phone.

What Not to Do When Rescuing a Wet Cell Phone

There are almostas many things not to do as to do, when rescuing a wet mobile phone.
Do not switch it on until it is dry. Don't heat the battery or it could leak or explode.


Warning: manufacturers of most cell phones place liquid damage indicator stickers that will change colors in the presence of a liquid inside their phones. This helps technicians know that you have dropped your phone in water, as most cell phone insurance coverage policies do not cover water damage.
Do not put the cell phone (or any electronic or metal-containing object) into the microwave.
Having followed these suggestions and tips, it might just be possible to get a wet cell phone to dry out and back to working order if the phone owner/ "phone drier-out "remembers to be patient and to do it slowly.

Many folks setting up wireless home networks rush through the job to get their Internet connectivity working as quickly as possible. That's totally understandable. It's also quite risky as numerous security problems can result. Today's Wi-Fi

networking products don't always help the situation as configuring their security features can be time-consuming and non-intuitive. The recommendations below summarize the steps you should take to improve the security of your home wireless network.

1. Change Default Administrator Passwords (and Usernames)

At the core of most Wi-Fi home networks is an access point or router. To set up these pieces of equipment, manufacturers provide Web pages that allow owners to enter their network address and account information. These Web tools are protected with a login screen (username and password) so that only the rightful owner can do this. However, for any given piece of equipment, the logins provided are simple and very well-known to hackers on the Internet. Change these settings immediately.

2. Turn on (Compatible) WPA / WEP Encryption

All Wi-Fi equipment supports some form of encryption. Encryption technology scrambles messages sent over wireless networks so that they cannot be easily read by humans. Several encryption technologies exist for Wi-Fi today. Naturally you will want to pick the strongest form of encryption that works with your wireless network. However, the way these technologies work, all Wi-Fi devices on your network must share the identical encryption settings. Therefore you may need to find a "lowest common demoninator" setting.

3. Change the Default SSID

Access points and routers all use a network name called the SSID. Manufacturers normally ship their products with the same SSID set. For example, the SSID for Linksys devices is normally "linksys." True, knowing the SSID does not by itself allow your neighbors to break into your network, but it is a start. More importantly, when someone finds a default SSID, they see it is a poorly configured network and are much more likely to attack it. Change the default SSID immediately when configuring wireless security on your network.

4. Enable MAC Address Filtering

Each piece of Wi-Fi gear possesses a unique identifier called the physical address or MAC address. Access points and routers keep track of the MAC addresses of all devices that connect to them. Many such products offer the owner an option to key in the MAC addresses of their home equipment, that restricts the network to only allow connections from those devices. Do this, but also know that the feature is not so powerful as it may seem. Hackers and their software programs can fake MAC addresses easily.

5. Disable SSID Broadcast

In Wi-Fi networking, the wireless access point or router typically broadcasts the network name (SSID) over the air at regular intervals. This feature was designed for businesses and mobile hotspots where Wi-Fi clients may roam in and out of range. In the home, this roaming feature is unnecessary, and it increases the likelihood someone will try to log in to your home network. Fortunately, most Wi-Fi access points allow the SSID broadcast feature to be disabled by the network administrator.

6. Do Not Auto-Connect to Open Wi-Fi Networks

Connecting to an open Wi-Fi network such as a free wireless hotspot or your neighbor's router exposes your computer to security risks. Although not normally enabled, most computers have a setting available allowing these connections to happen automatically without notifying you (the user). This setting should not be enabled except in temporary situations.

7. Assign Static IP Addresses to Devices

Most home networkers gravitate toward using dynamic IP addresses. DHCP technology is indeed easy to set up. Unfortunately, this convenience also works to the advantage of network attackers, who can easily obtain valid IP addresses from your network's DHCP pool. Turn off DHCP on the router or access point, set a fixed IP address range instead, then configure each connected device to match. Use a private IP address range (like 10.0.0.x) to prevent computers from being directly reached from the Internet.

8. Enable Firewalls On Each Computer and the Router

Modern network routers contain built-in firewall capability, but the option also exists to disable them. Ensure that your router's firewall is turned on. For extra protection, consider installing and running personal firewall software on each computer connected to the router.

9. Position the Router or Access Point Safely

Wi-Fi signals normally reach to the exterior of a home. A small amount of signal leakage outdoors is not a problem, but the further this signal reaches, the easier it is for others to detect and exploit. Wi-Fi signals often reach through neighboring homes and into streets, for example. When installing a wireless home network, the position of the access point or router determines its reach. Try to position these devices near the center of the home rather than near windows to minimize leakage.

10. Turn Off the Network During Extended Periods of Non-Use

The ultimate in wireless security measures, shutting down your network will most certainly prevent outside hackers from breaking in! While impractical to turn off and on the devices frequently, at least consider doing so during travel or extended periods offline. Computer disk drives have been known to suffer from power cycle wear-and-tear, but this is a secondary concern for broadband modems and routers.

If you own a wireless router but are only using it wired (Ethernet) connections, you can also sometimes turn off Wi-Fi on a broadband router without powering down the entire network.

This tutorial is divided into the following parts.


1)Creating the layout (Starts below)
2) Creating the Main Movieclip
3) Adding Some Content
4) Optimizing the Images
5) Adding More Content
6) Making the Buttons
7) Preloading the Website


Part 1) Creating the Basic Layout
For the first part, we're going to create the basic layout for the website.
Step 1.

First of all create a new Flash document with the settings shown below. For the background color I've used #55666D


Step 2.
We're going to create a rectangle for the background of the site. Set the stroke color (circled in blue), using the icon circled in red. This will prevent there from being a border around the rectangle.

Step 3.
Set the fill color (circled in blue) to white (circled in red).

Step 4.
Choose the rectangle tool (circled in red) and create a rectangle with the settings shown below in the properties panel. The stage has been zoomed out to 50%.

art 2) Creating the Main Movieclip
Step 5.
Next we'll be creating the main MC (movieclip) where all the parts of the website will go. The main MC will be on the root timeline of the flash movie. So, click on the white rectangle and convert it into an MC called 'main'. You can do this by either pressing f8 or by going to Modify > Convert to symbol.

Step 6.
So, now that we've created the main MC, double click on it.

Step 7.
Click on the white rectangle again and convert into another MC, this time named 'background'

Step 8.
Double click on the background MC and choose the Selection Tool (V). Drag your mouse over the white rectangle, selection around 3/4 of it.
Step 9.
Set the fill color (circled in blue) to a dark grey color (#484848)
Enlarge Image
Step 10.
So that's the background MC created, go back to the Main MC. Name the layer with the background MC "background" and create 2 other layers called "content" and "buttons"

Part 3) Adding Some Content
Step 11.
In part 3 we're going to be adding some content. Using the Text Tool (T), add a title for the site's homepage, using the settings below.

Step 12.
Convert the text into an MC called 'content'

Step 13.
Go into the content MC and name the layer "sections"

Step 14.
Add a subheading, if you like, using the settings shown below.
Step 15.
And some body text.
Step 16.
You can use the Align Panel (Window > Align) to align all the text to the right, by click on the icon circled in red.
Step 17.
I've copied (edit > copy) the title and subtitle and pasted (edit > paste in place) it to the right for a 'featured' section.


Part 4) Optimizing an Image & Making it a Button
Step 18.
Now we're going to add an image and optimize it. When importing images (File > Import > Import to Stage) into flash you have the ability to optimize them, but a balance must be struck between quality and low file size, to allow for quick loading of the flash file (SWF). It's good to optimize your images from within flash, becuase you can tweak their quality whenever you want, without having to open them up again in an image editing program. So the file extension i usually use for images is PNG, which provides a high quality image. So below you can see a image, that I've imported, as the featured item of the Flash site.


Step 19.
The image is called "best.png". You can optimize it by right clicking on 'best', from the layers panel, and by choosing properties. You'll then be shown the panel shown below.
Step 20.
Un-check the 'Use document default quality' settings, and the default quality (50) will be revealed. You can see a preview of th quality in the image to the left which, as you can see, is quite poor. You can also see the size of the image at the bottom.
Step 20.
Un-check the 'Use document default quality' settings, and the default quality (50) will be revealed. You can see a preview of th quality in the image to the left which, as you can see, is quite poor. You can also see the size of the image at the bottom.
Step 21.
Now that the image has been optimized, we're going to create turn it into a button, that opens up a browser window. Convert the image into an MC (F8) called 'bestMC'
Step 22.
Give the MC an instance name, from the properties panel, called 'best'.
Step 23.
The image can now be given some functionality by refering to the instance name. In the content MC, create a new layer called script and click on the 1st frame of the layer. Open up the actions panel and enter the code shown below. This code refers to the image, using the instance name 'best', giving it an onRelease function. So when ever the image is pressed and release, it can be told to do something. In this case, it's told to open up a browser window (getURL), using the address of this website. We also have to add a stop action, because we're about to create more frames in the content MC.


Part 5) Adding More Content
Step 24.
Next we're going to add the rest of the content. Later on we'll be creating some buttons which. when pressed, will display it's corresponding section. In the content MC we''re going to create each section at a different frame. When one of the buttons is pressed, the content MC will go to the frame with the right content on. To do this, we're going to give each section a label that we can tell the content MC to go to. So, create a new layer called 'labels', inbetween the script and section layer. Click on the first frame of the labels layer and, at the properties panel, enter 'about' under 'frame' (cirlced in red).


Step 25.
Select frame 10 of all the layers and then insert key frames for each layer (F6)
Step 26.
On frame 10, of the labels layer, add another label called "portfolio". You can add more frames, extending them fto frame 20, by using f5 while layer 10 of all frames are selected.
Step 27.
Change all the text to suit this section and add the first thumbnail for your portfolio
Step 28.
Convert the image to an MC called 'thumb0'
Step 29.
Add more thumbnails, also converting them to MC's called thumb1, thumb2, thumb3 etc. Then give the thumb0 mC the same instance name, which we'll use to give some functionality. Do the same with each of the other thumbs, giving thumb1 MC the instance name 'thumb1' etc.
Step 30.
Click on frame 10 of the script layer and open up the Actions panel. As we did with the featured image, add the code show below, this time swapping the URL address for what ever you want the thumbnails to open up.
Step 31.
Add an onRelease function for each of the other thumbnails.
Step 32.
For the 3rd section, create another key frame (F6) at frame 20 of all the layers
Step 33.
Create the a label for the 3rd section. As you can see i've made it 'resume'
Step 34.
So that's all the sections completed in the content MC, go back to the main MC and give the content MC and instance name. We can then use the instance name to control the content MC.


Part 6) Creating the Buttons
Step 35.
Now we're going to create some buttons to tell the content MC to go to the corresponding label. First of all, double click on the rectangle tool and set the corner radius to 10 points.


Step 36.
On the buttons layer, create a rounded rectangle, using the same grey that was used for the background.
Step 37.
Conver the rectangle into an MC called "button_background"
Step 38.
We can now use and instance of button_background MC for each button. So copy and paste the 1st one, placing it to the right.
Step 39.
Create a 3rd instance, and then convert the 1st one into another button symbol called 'about'. This button will be used to tell the content MC to go to the 'about' label.
Step 40.
Convert the button_background instance into a button symbol called 'portfolio' and the 3rd into a button symbol called 'resume'.
Step 41.
Double click on the about button symbol and you'll be displayed with what's shown in the image below.
Step 42.
Create a new layer and add the text 'about'
Step 43.
Then do the same with the portfolio button symbol, but this time placing the text 'portoflio' in the 2nd layer.
Step 44.
Go back to the main MC. Do the same for the resume button, and then give the about button symbol the instance name 'about'. Give the portoflio button the instance name 'portolfio' and the resume button the instance name 'resume'
Step 45.
Create a layer called "script", above the buttons layer in the main MC. Open up the Actionc spanel and add the actionscript shown below. This script give each button functionality, so that when they're pressed, the content MC goes to the corresponding sections.


Preloading the Website
Step 46.
For this final part, of the tutorial to create a basic Flash website, we're going to create a preloader for the website. Go back to root of the time, where the 'Main' MC is, and move the frame, that it's on, to frame 2.

Step 47.
Now make a text field on the 1st frame, with the text "loading", using the settings shown below

Step 48.
Convert the text field (F8) to an MC called 'loader'

Step 49.
Double click on the 'loader' MC and create a 2nd text field on the right, with the text "99%". From the properties panel the text has been made "dynamic", and a Var (variable) has been given to it called "percent". When the website is preloading, this variable will hold the percent value that's loaded so far, and it'll be displayed in the dynamic text field.

Step 50.
Go back to the root timeline. Instead of placing the code on a frame on the timeline, put it on the loader MC, by clicking on it, opening up the Actions Panel, and then entering the code, shown in the image below. This block of Actionscript will check to see how much of the website has loaded and display the percentage in the text, using the 'p' variable. Once all of it is loaded, the timeline will go to frame 2, and the site will be displayed

Step 51.
Last of all, on the 1st frame of the root timeline, place a stop() action on a layer called, 'script'.
And that brings us to the end of this Flash tutorial to create a Basic Website
Download FLA